Garlic Herb No Knead Bread
By Dawn Mikesell
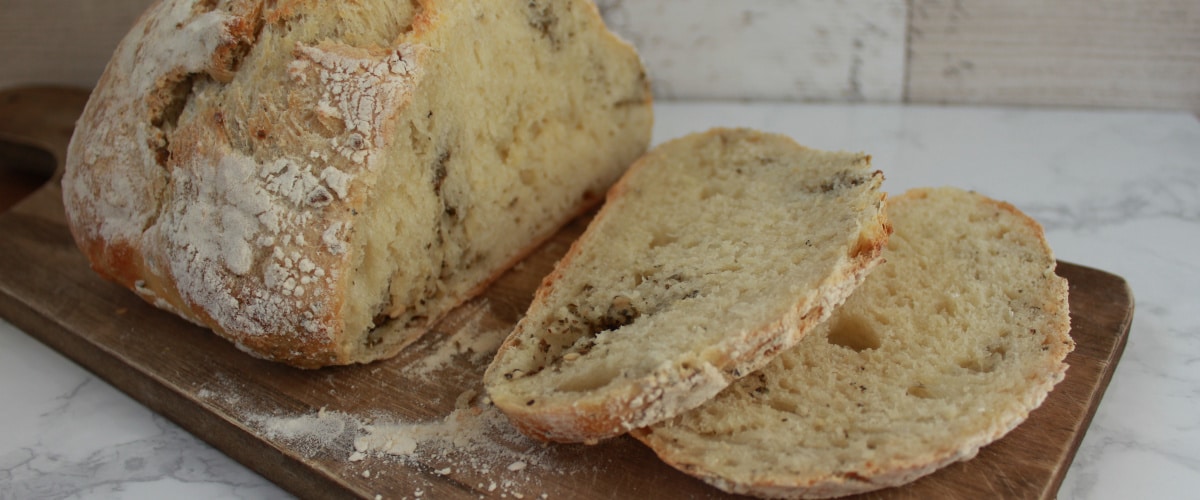
Garlic Herb No Knead Bread is on the menu today. I have to say that I’ve never made a no knead bread before because I looked at it as cheating. I know how to make kneaded bread and I have a mixer to do that work for me, so why would I need to stoop to a no knead bread? I started getting curious, though. Then I saw a recipe that sounded really good, so I tried it. Let me tell you, I’m so glad I did!
Contrary to my former belief, no knead breads are NOT cheating because there’s more than one way to develop gluten. One is, obviously, by kneading. Another way is by not kneading. Let me explain: If you have a dough that’s wet enough, as it sits for 12-18 hours, the glutenin and gliadin move around and form gluten on their own. The dough does need to be wet enough, though, and it works best with a lean dough. A lean dough is one without fat and other extras. Pretty much just flour, salt, yeast, and water. Below is a picture of some no knead dough that had been sitting for a couple of hours. You can see how wet it is.
The result is a crusty, chewy, dense bread. I haven’t been this excited about a loaf of bread in years. I’m seriously so happy about this. Imagine the possibilities! Because kneading is not required, it’s a perfect solution for baking bread in an emergency situation where you don’t have electricity to power a mixer. Just pop it in a dutch oven to bake over some coals. My husband and I are planning on taking this recipe camping with us this summer. Wouldn’t it be fun to mix up a batch of dough in the morning, let it sit all day, throw it in a dutch oven that evening and have some fresh baked bread with dinner? I think so!
It’s also a great solution for those who can’t make the investment in a mixer yet. Or if you’re like me and you have a mixer and can consistently produce great loaves of bread, it’s still a fun way to easily make a different style of bread with a different (and amazing) texture. So I hope you give this recipe a try! I’m sure you’ll be glad you did.


- 3 cups all-purpose flour
- 2 teaspoons salt
- 1/2 teaspoon SAF Instant yeast
- 1 1/2 cups lukewarm water
- 2 tablespoons Italian seasoning
- 5 cloves garlic, smashed into small pieces
- In a large mixing bowl, whisk together flour, salt, and yeast.
- Add water and mix until a shaggy mixture forms. You may need to add a little water if the air is dry. Just make sure your mixture is loose enough to sort of stir.
- Cover bowl with greased plastic wrap and set aside (not in the fridge, the counter is fine) for 12-18 hours. Mixing it up first thing in the morning or the night before works well.
- When ready to bake, sprinkle the Italian seasoning and garlic over the dough. Mix it in as well as you can. This is kind of difficult, but with some floured hands, it can be done. It doesn't have to be evenly distributed. You can see in my pictures that there are ribbons of garlic and herbs throughout the bread.
- Pour the dough onto a heavily floured movable surface (parchment paper, cutting board, etc.). With floured hands, shape the dough into a ball.
- Lightly cover with greased plastic wrap and let sit while you prepare your cast iron vessel.
- Preheat oven to 450 degrees. Place a cast iron skillet or dutch oven (I used a cast iron skillet) in the oven to heat up for 30 minutes.
- Remove the cast iron skillet or dutch oven from the oven. Flip the dough into the pan (it will end up upside down from how it was and that's fine).
- Return to oven and bake for 30 minutes.
- Remove bread from oven and place on a cooling rack to cool.

Hello,
I’ve made this twice and it’s absolutely delicious! Thank you…
My loaves have not risen like I see yours has in the photos. I’ve used Active Dry Yeast…that’s all I can find in stores lately. I put the yeast in a little bit of 105º water to dissolve after reading about the difference between these two kinds of yeast.
Do you have any thoughts about why mine have not risen into a nice big boule? I’ve followed all of the other instructions to a T.
Thanks,
Michael
I’m really not quite sure. It could be the yeast. Have you tried adding the active dry yeast straight into the flour without dissolving first just like you would with instant yeast?
I’ve made this bread a bazillion times and it’s not always as high as I got the one I photographed to be. I found that the doughs that had a little more flour and were a little less sticky tended to rise higher.
Altitude might also play a role. I’m in Ogden, Utah with an altitude of about 4,300 feet. I’m not sure where you’re located, but if you’re at a lower altitude you may want to try adding a smidge more yeast.
I hope this is helpful and you can get the rise you’re looking for. Let me know if you have any other questions. 😊
Awesome! Let me know how it works out for you! We can troubleshoot some more if you need.
Hello Dawn,
Thanks for this…I’ll try adding the yeast directly to the mix and use just a bit more flour, or less water. I’m just about at sea level, twelve miles north of the Golden Gate bridge…
Thanks again,
Michael